Calendar scheduler: Scheduling an event
Last updated: June 9, 2026
Pro feature: This feature is available on Pro plans only. If you’d like to upgrade your plan, please contact our support team.
Overview
Once your admin has set up the bookable event types at a location, you can schedule events — visits, viewings, assessments, phone calls, care starts and general events — directly from an enquiry's timeline. The scheduler checks each host's real-time availability so you can pick a time that works for everyone, and if your team has connected Outlook, it also takes their Outlook calendars into account.
You can also use the scheduler to record events that have already happened (for example a viewing that took place last week), so the enquiry timeline reflects the full history.
If you don't see Schedule event on the enquiry timeline, speak to your admin or account manager.
How to use it
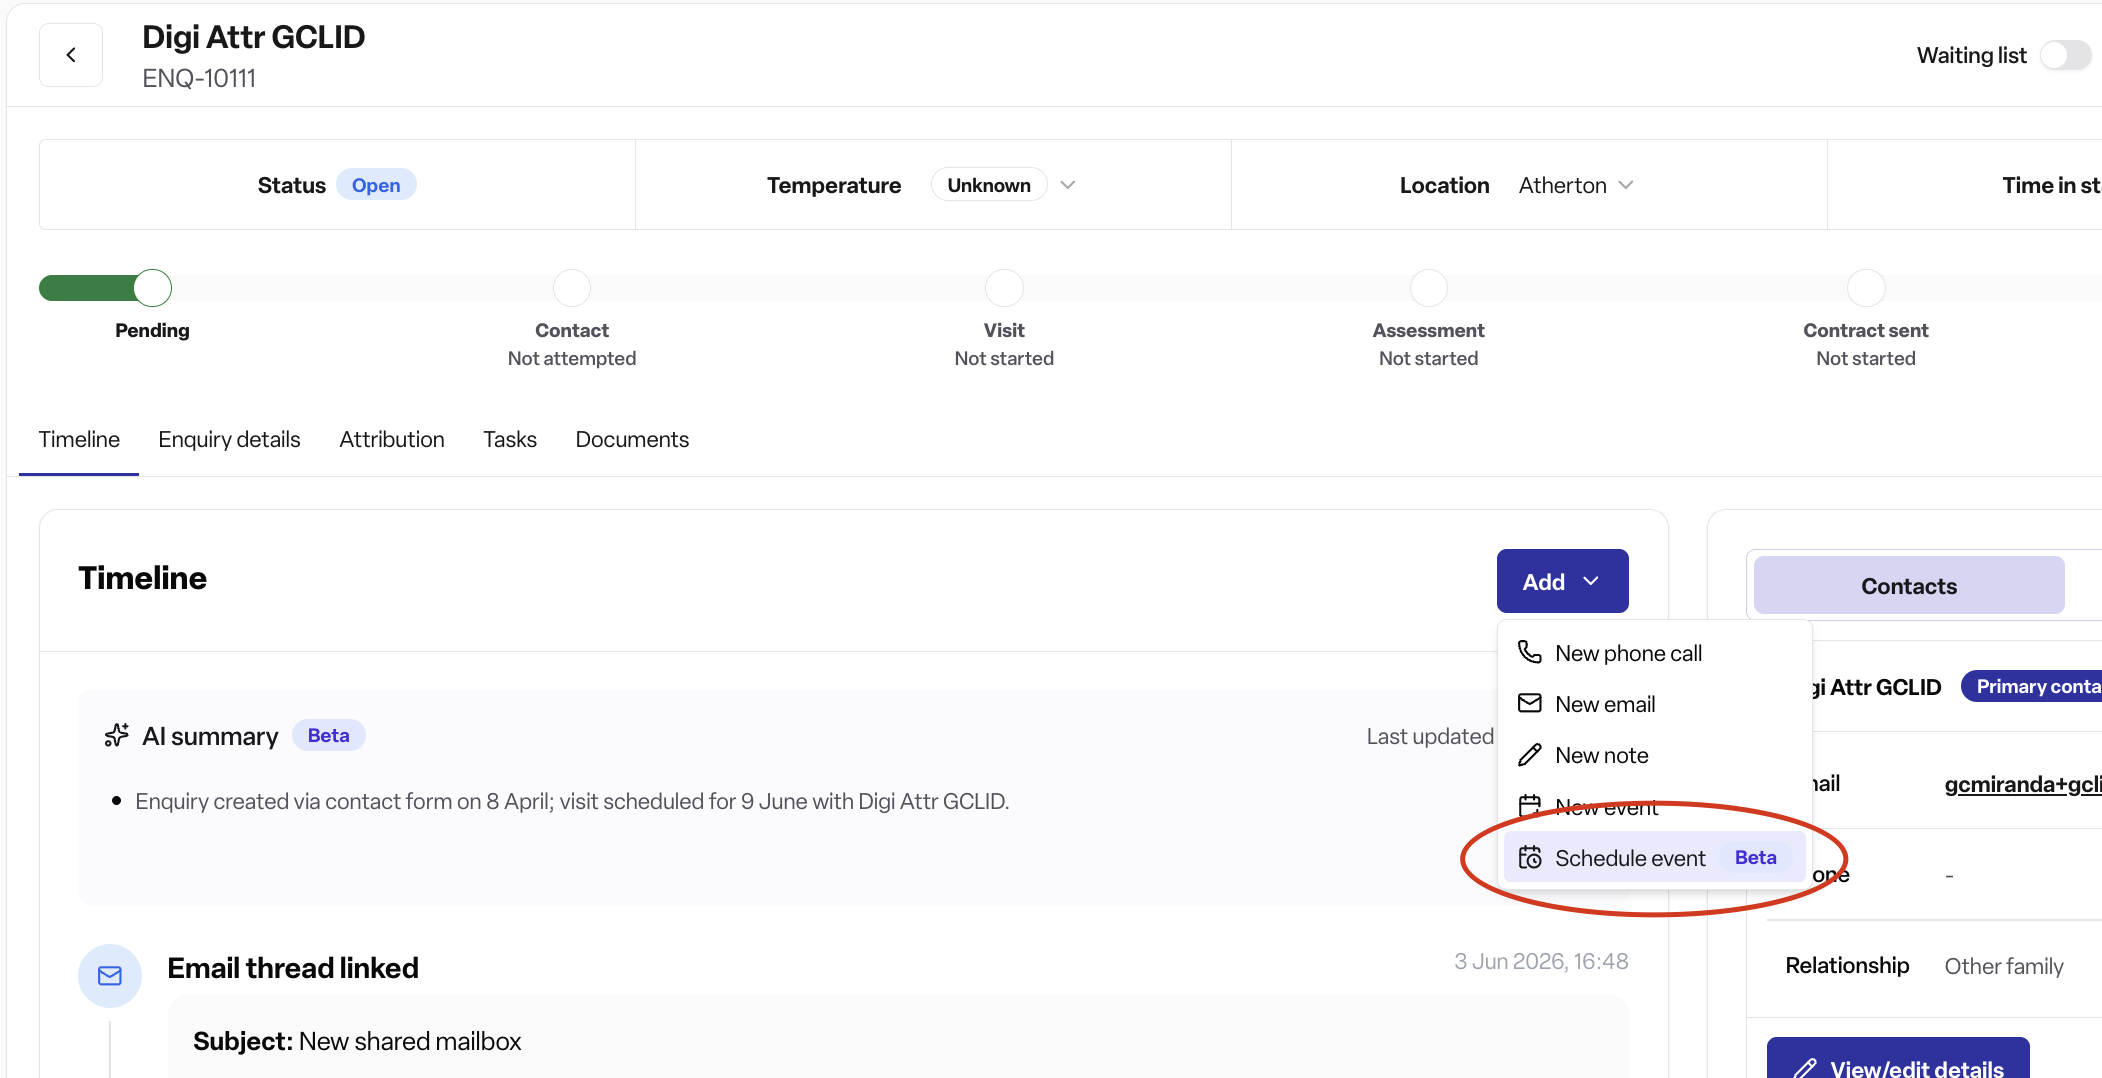
Open the schedule event modal
Open the enquiry you want to book the event against.
On the enquiry timeline, click the Add dropdown.
Choose Schedule event (marked beta).
You need edit access on the enquiry to see this option.
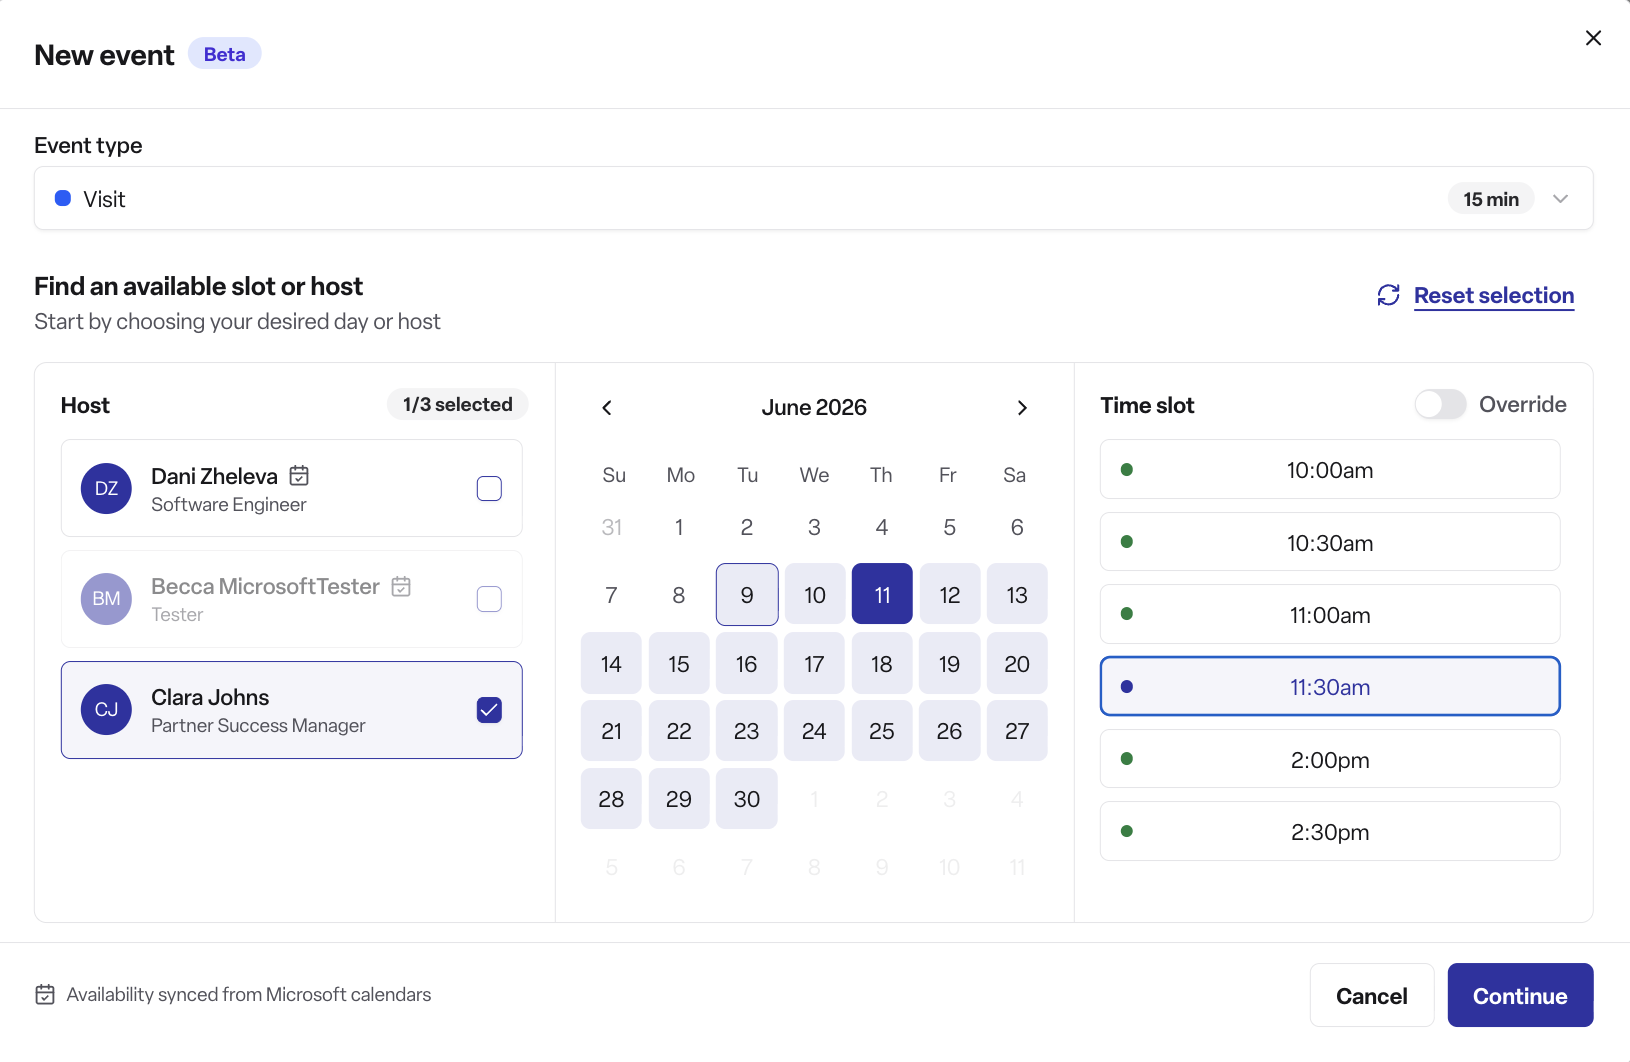
Step 1 — New event
The first screen of the modal is titled New event. Fill in the fields in order:
Event type — pick from the dropdown (for example "Viewing" or "Assessment"). Each option shows a duration badge such as "90 min". If only one event type is set up for the location, this field is hidden.
Hosts — tick the staff members you want to host the event. A counter shows "X / Y selected". If a host's Outlook is connected, a small calendar icon appears next to their name with the tooltip "Availability synced from Microsoft calendar".
Date — pick a day from the calendar. Days with available slots are highlighted. You can also pick a past date to record an event that already happened.
Time slot — pick a slot from the list. Slots are colour-coded:
Green — all selected hosts are free
Orange — some of the selected hosts are free
Blue — the slot you've selected
There is an Override toggle next to the slot list. For future dates you can switch it on if you want to book outside the normal available slots. For past dates it's switched on automatically and locked — the scheduler then shows every 30-minute slot across the day so you can pick the exact time the event happened.
If a required field is missing, you'll see a message at the bottom like "Please select event type, host, date, time slot to continue".
Click Continue when you're ready. Click Cancel to discard the booking.
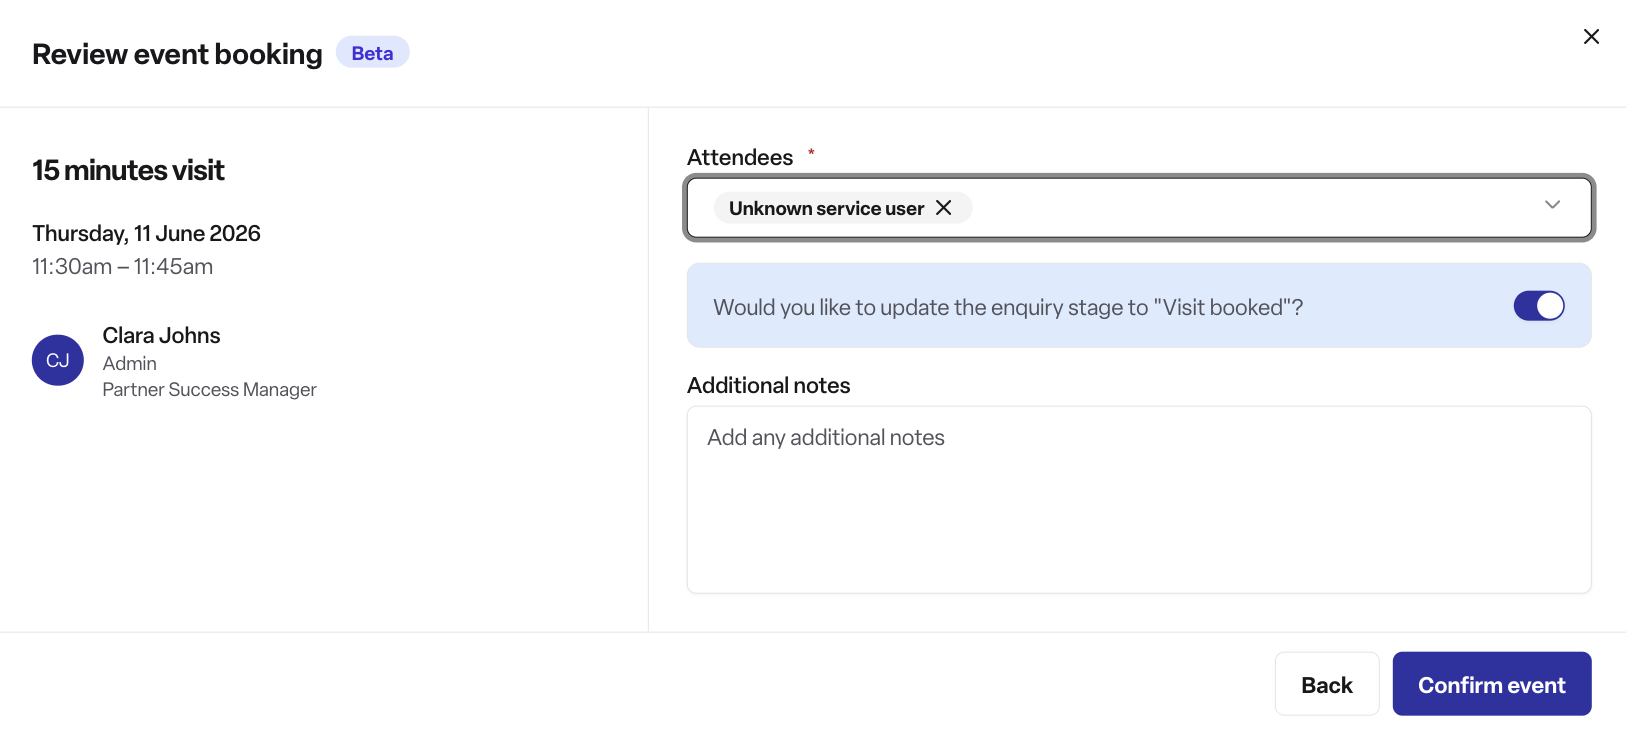
Step 2 — Review event booking
The second screen is titled Review event booking. The left side shows a summary of what you're about to book:
A "Past event" badge if the slot is in the past
The duration and event type
The full date and time range
The selected hosts with their name, role and job title
On the right side, complete the remaining fields:
Attendees — pick the contacts and service users attending. They are pulled from the enquiry. Each attendee is shown with a tag of either "Contact" or "Service user". You can search the list, and add a new contact inline by typing a name and choosing "Add [name] as a new contact". At least one attendee is required.
Status — only appears for past events. Pick from Completed, Cancelled or No show. For future events, the status is set to pending automatically.
Update enquiry to [stage] — if the status you've picked would normally move the enquiry to a new workflow stage, a toggle appears so you can confirm whether the stage should update.
Additional notes — optional. Add any context you want recorded against the event, up to 10,000 characters.
Click Confirm event to save. Click Back if you need to change the host, date or time.
After confirming, you'll see "Event was successfully created", the modal closes, and the new event appears on the enquiry timeline and on your calendar.
Rules and things to know
You need edit access on the enquiry to schedule an event against it.
You can only schedule event types that have been set up and marked active for that location.
You can only host with staff who have been assigned as hosts for that event type at that location.
You must pick at least one attendee.
Notes are limited to 10,000 characters.
For future dates, only slots that respect the location's working hours and notice period appear, unless you turn on Override.
For past dates, Override is on automatically — every 30-minute slot across the day is available so you can record exactly when the event happened, and you must pick a status (completed, cancelled or no show).
If a slot moves from future to past while you're filling in the form (for example, midnight passes), Found will ask you to pick a status before letting you save.
The Outlook sync icon next to a host's name confirms that their Outlook calendar has been checked alongside their Found events.
Who can do this
Scheduling events — anyone with edit access on the enquiry and access to the location.
Adding new contacts inline — requires the relevant contact-creation permission. Without it, you'll need to add the contact separately first.
Setting up event types and hosts — admins and managers, from Settings → Scheduling. Staff who only book events don't need this permission.
Frequently asked questions
Q: Where do I schedule an event? A: From the enquiry timeline. Click Add → Schedule event.
Q: Why don't I see "Schedule event" on the timeline? A: Either the calendar scheduler is not enabled for your workspace (it's in beta), or you don't have edit access to that enquiry.
Q: How do I book a viewing? A: Open the enquiry, click Add → Schedule event, choose "Viewing" (or "Visit", depending on the location's care type), pick a host, date and time, add the attendees and click Confirm event.
Q: Why don't I see a particular staff member as a host? A: They haven't been added as a host for that event type at that location. Your admin can add them at Settings → Scheduling.
Q: What do the coloured dots on the time slots mean? A: Green means every host you've selected is free, orange means only some are free, and blue is the slot you've selected.
Q: A host I've selected has a small calendar icon next to their name — what is it? A: That's the Outlook sync indicator. It means their Outlook calendar has been checked along with their Found events, so the availability shown takes both into account.
Q: Can I book outside a host's working hours? A: Yes — switch on the Override toggle next to the time slots. The scheduler will then show every 30-minute slot across the day.
Q: Can I record an event that's already happened? A: Yes. Pick a past date — the Override toggle switches on automatically so you can choose any slot, and you'll need to set a status on the review step.
Q: What statuses can I set? A: Future events default to pending. For past events you can pick Completed, Cancelled or No show.
Q: What's the "Update enquiry to [stage]" toggle? A: If the status you've picked normally moves the enquiry to a different workflow stage, this toggle lets you confirm the stage change while saving the event.
Q: Can I add an attendee who isn't already on the enquiry? A: Yes — search for them in the Attendees field. If they're not found, you can pick "Add [name] as a new contact" to create them inline (if you have permission to add contacts).
Q: Is there a limit on notes? A: 10,000 characters.
Q: What happens after I confirm the event? A: You'll see "Event was successfully created", the modal closes, and the event appears on the enquiry timeline and the calendar.
Q: Can I schedule an event from somewhere other than an enquiry? A: Not at the moment — the scheduler is only available from the enquiry timeline.