Real-time visit scheduler
Last updated: August 6, 2026
Overview
The real-time visit scheduler lets a care seeker book a visit directly into your location's live availability — through the location's Lottie listing, an embeddable form, or Eliza (Found's AI receptionist) — without a member of staff manually arranging the time. Found checks the connected calendars of the location's hosts and only offers slots that are actually free.
To make a location bookable this way, a workspace has to complete a one-off setup flow that:
Connects the workspace's Microsoft 365 or Google Workspace calendars to Found
Sets the "organiser calendar" each location sends invites from
Configures, per location, who can host a visit, and how long a visit lasts and how much notice a visit requires
Once a location has all three in place, it goes live and starts taking real-time bookings.
Where to find it
You can get to the real-time visit scheduler setup from three places:
The Enquiries page: A banner at the top invites you to "Enable scheduling." You can close it if you're not ready — it'll remember that and stay closed for you. It disappears for everyone automatically once every location that can take visits is already live, since there's nothing left to set up at that point.
Settings → Scheduling. The same banner appears here, but it can't be closed — so if you ever need to find your way back in, this is the reliable spot.
Your onboarding checklist: if your account is an admin. There's a task called "Enable real time scheduling of visits." Clicking it opens the setup straight away.
However you get there, clicking "Enable scheduling" opens the same full-screen, step-by-step setup.
Step-by-step setup
Step 1 — Connect calendars
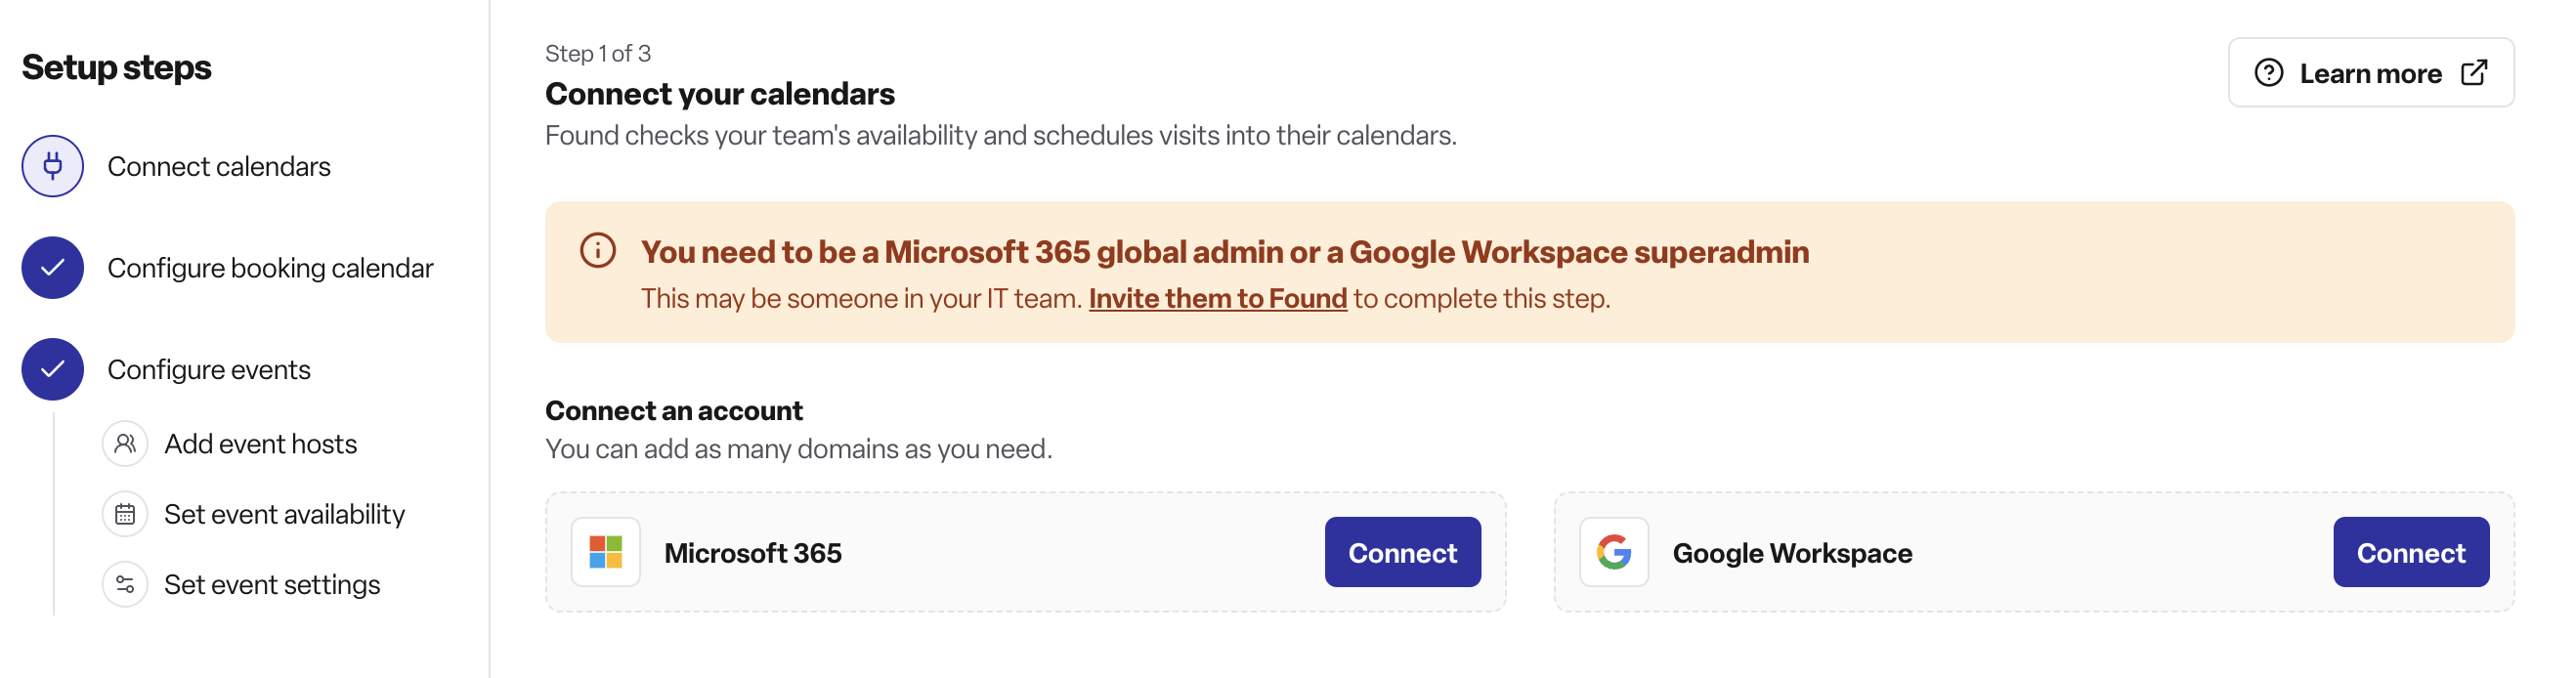
Connecting Microsoft 365
On the Connect calendars step, select Connect on the Microsoft 365 tile.
Login to your Microsoft account.
Found sends you to Microsoft's admin-consent page. You must complete this as a Microsoft 365 global admin — Found requests calendar access only (not email), signed into a short-lived token that also remembers this setup flow as where to send you back.
Approve the consent on Microsoft's side.
Microsoft redirects back to Found, which verifies that token and creates/claims the tenant for your workspace.
You land back inside the setup wizard, mid-flow — not dropped onto a generic settings page.
The tenant now appears under "Connected accounts," already switched on, showing a "Connecting" badge for a few minutes while Microsoft's permissions finish propagating. The Calendars toggle stays disabled until that clears.
Once it clears, the toggle is interactive — no action needed unless you want to turn that calendar off.
If the consent fails (e.g. that Microsoft tenant is already connected to a different Found workspace, or a generic error), you're returned to the wizard with a toast error rather than a broken screen.
Connecting Google Workspace
This isn't a redirect — selecting Connect on the Google tile opens a 4-step in-app guide a Google Workspace superadmin works through:
Open your Google Admin console — a provided link to the domain-wide delegation page. You need to be signed in as a Google Workspace admin.
Confirm the client ID and scopes — Found pre-fills both; you paste them into that delegation page in Google Admin. These scopes let Found read free/busy availability and manage the calendar events it schedules.
Allow time for it to take effect — Google can take a few minutes to apply a new delegation, occasionally up to 24 hours.
Verify and connect — back in Found, enter the workspace's primary domain and a test mailbox address; Found confirms it can read availability and manage events on that mailbox before marking the connection live. A failure right after authorising usually just means it needs a few more minutes — retry rather than redo the setup.
Once connected
Each connected account can be toggled on/off individually via the Calendars switch in the list — this only applies once "Connecting" has cleared.
If a connection is revoked or errors, it's flagged ("Access revoked" / "Connection error") rather than disappearing. Microsoft accounts get an inline Reconnect button right there in this step; Google doesn't — a revoked Google connection needs redoing from Settings → Integrations → Email and calendars → Tenants.
Email access isn't requested here — a tenant connected through this flow is calendar-only. Adding email later is an "Add email" upgrade action on the Tenants settings page (Settings → Integrations → Email and calendars → Tenants), which triggers its own Microsoft re-consent — it's not available for Google.
Step 2 — Configure booking calendar
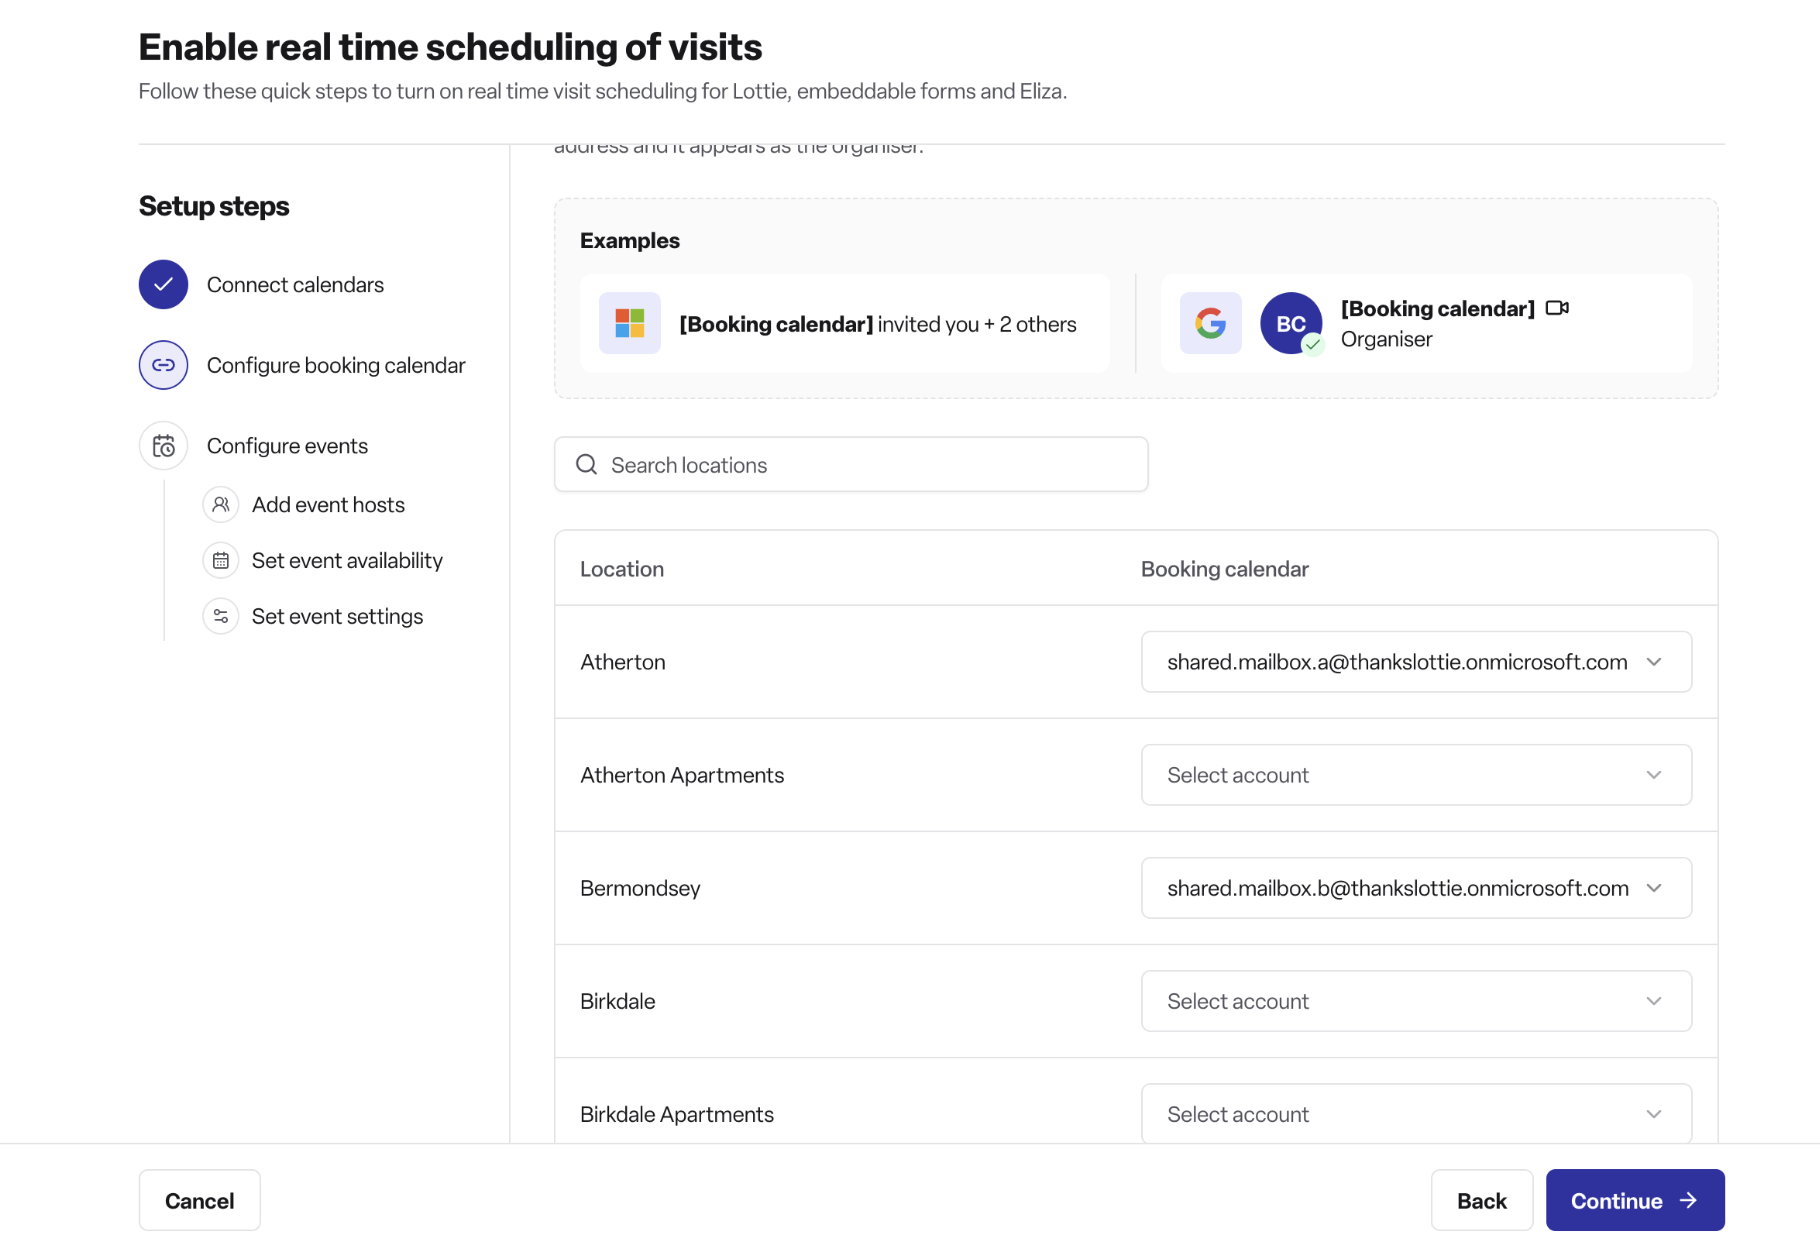
For each location, choose the mailbox/calendar that visit invites are sent from and that appears as the organiser.
Locations can be searched by name; each row shows whether a booking calendar is already set.
Step 3 — Configure events
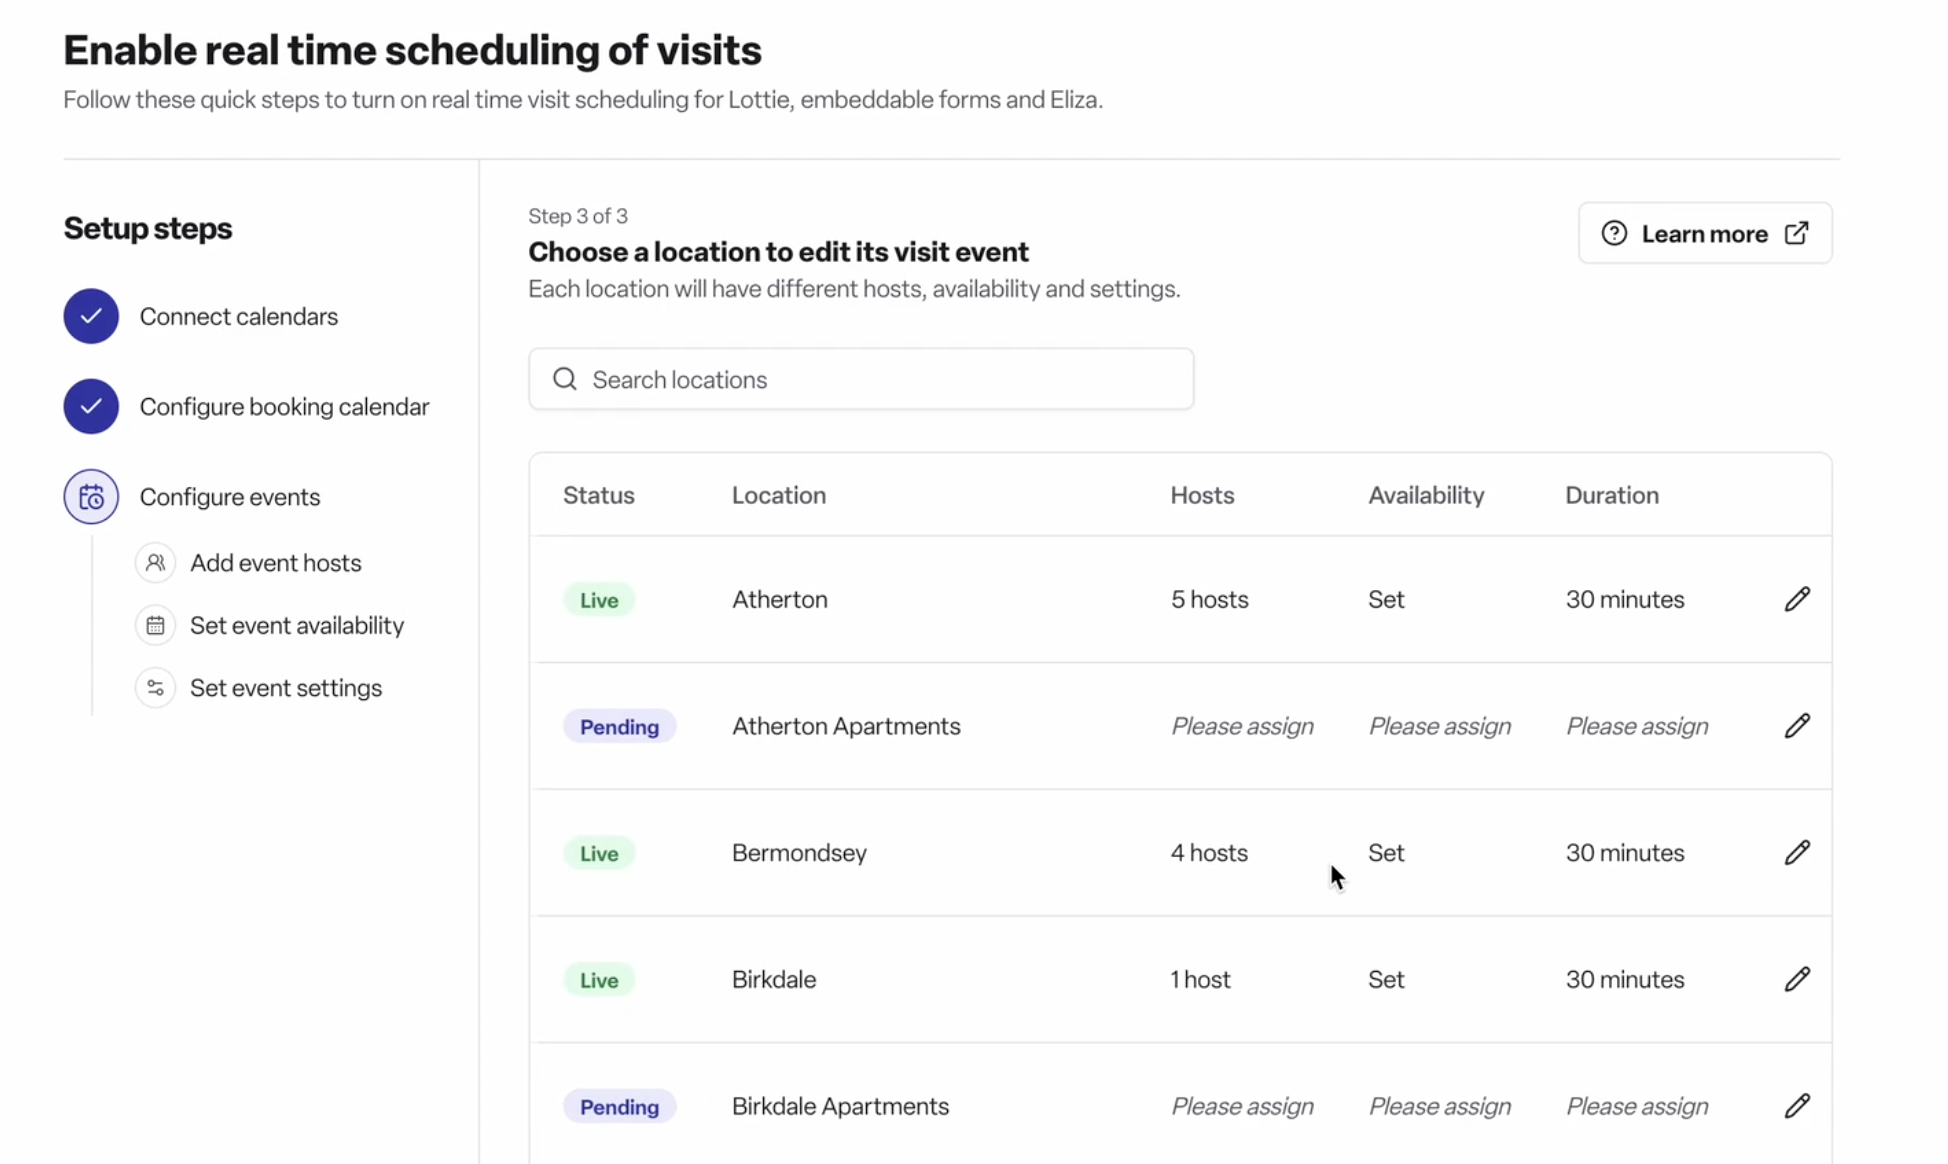
Working through a location opens three sub-steps:
Hosts — select which staff at that location can take a visit. Staff can be searched and filtered by role, and new team members can be invited from here. At least one host must remain selected — the last one can't be unchecked.
Availability — set the weekly hours visits can be booked into, using the standard weekly schedule editor. If nothing has been saved before, it opens on the default week (Monday–Sunday, 09:00–18:00) rather than empty.
Settings — set:
Event duration (defaults to 60 minutes for a visit)
Required host count — how many hosts must be free to book
Notice period — how far ahead a booking must be made (defaults to 2 hours)
If a calendar hasn't been connected yet, this screen shows a reminder that one is required before scheduling can be enabled.
Finishing settings shows Enable real-time scheduling. There's deliberately no separate "should this be bookable?" question — completing this step always makes the location externally bookable, so the team isn't asked to confirm something they've already opted into by starting the flow.
How it works on Lottie
Live availability for a listing's Visit event type is fetched from Found in real time. If there's a bookable slot within the notice window, the listing shows the instant book widget — a blue "Instant book a visit: no waiting for a callback" badge — instead of the standard request a visit CTA. The care seeker taps a slot, and Found books it immediately, no staff action required. If nothing is available, the listing quietly falls back to "Request a visit," which your team still confirms manually.
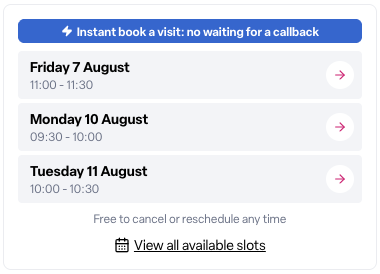
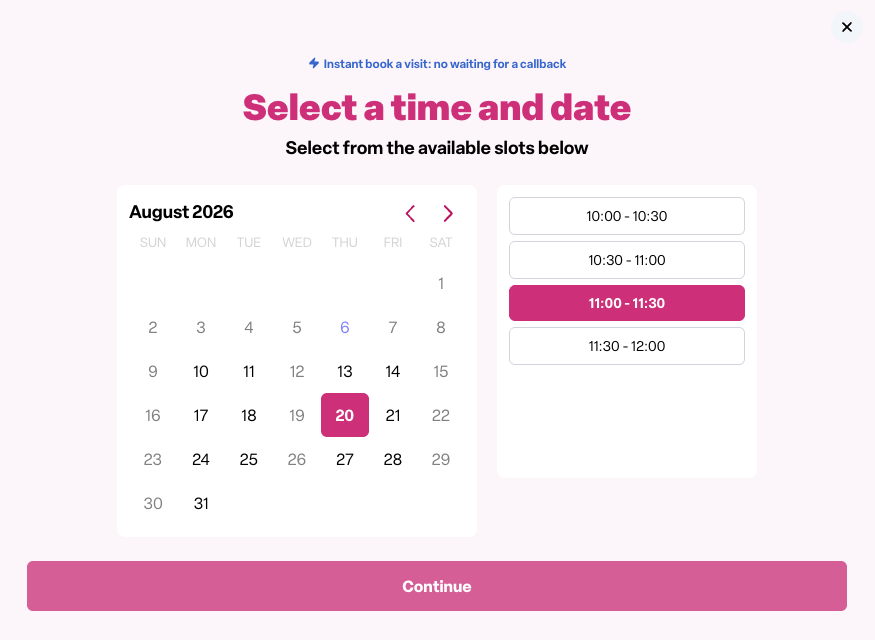
Care home listings are the only listing type instant book currently supports.
Permissions
Plan/module: Found Pro, with the Occupancy module enabled.
Roles: Admins and Managers can run the setup flow and edit a location's hosts, availability and event settings. Staff don't have access to configure it — they can only be assigned as a visit host by an Admin or Manager.
Note this is separate from the Microsoft 365/Google Workspace admin needed for Step 1 (see above) — that's an IT permission on the calendar tenant, not a Found role.
Frequently asked questions
Q: Where do I go to turn on real-time scheduling? A: The Enquiries page shows a banner inviting you to enable it, until it's dismissed or every eligible location is already live. From there, selecting "Enable scheduling" opens the setup flow.
Q: I dismissed the banner — how do I get back into the flow? A: Go to Settings → Scheduling, where the banner always stays available — or, if you're an admin, use the "Enable real time scheduling of visits" task in your onboarding checklist.
Q: What locations can use real-time scheduling? A: Care home locations, for now — they support the "Visit" event type and are the only listing type instant book shows on. Home care and retirement living aren't included yet.
Q: If I leave the flow partway through, do I lose my progress? A: No. "Save & exit" keeps anything you've entered, and each step's status is read from your live data rather than how far you clicked — so reopening the flow takes you back to the first step that's still outstanding.
Q: Can I set up locations one at a time instead of all at once? A: Yes. Completing one location shows a confirmation and offers to move straight on to the next pending location, but you can also close and come back later.
Q: Who can complete the "Connect calendars" step? A: You need to be a Microsoft 365 global admin or a Google Workspace superadmin for that step — not just a Found admin. If that's not you, the step lets you invite that person into Found.
Q: Does connecting a calendar here also give Found access to email? A: No. This flow only requests calendar access. Email access is a separate, later step in Settings → Integrations if you want it.
Q: What happens if a connected calendar's access is revoked? A: It stays listed with a "Access revoked" or "Connection error" badge and a Reconnect option, rather than disappearing.
Q: What are the default visit settings if I don't change them? A: 60 minutes duration, 2 hours' notice, and Monday–Sunday 09:00–18:00 availability, with at least 1 host required.
Q: Can I remove all hosts from a location's visit event? A: No — a visit event needs at least one host, and the last one can't be unchecked.
Q: Is there a step where I choose whether a location should be bookable externally? A: No. Finishing the setup for a location always makes it externally bookable — there's no separate on/off question, since starting the flow is already the decision to enable it.
Q: Once a location is live, where do bookings come from? A: The location's Lottie listing, embeddable forms, and Eliza.
Q: Who can access this feature? A: Found Pro workspaces with the Occupancy module enabled. Within a workspace, Admins and Managers can set it up; Staff can be assigned as hosts but can't configure it.
Q: What if I need several days' notice? A: The notice period field only offers hours or minutes — there's no "days" option. Convert it yourself: 2 days' notice is 48 hours.