Understanding the contacts tab
Last updated: July 28, 2026
Overview
The Contacts tab is your central hub for managing all the people and professionals connected to your care services. Whether it's a service user's family member, a neighbour who checks in regularly, or a social worker coordinating care, the Contacts tab keeps all their details organised and accessible in one place.
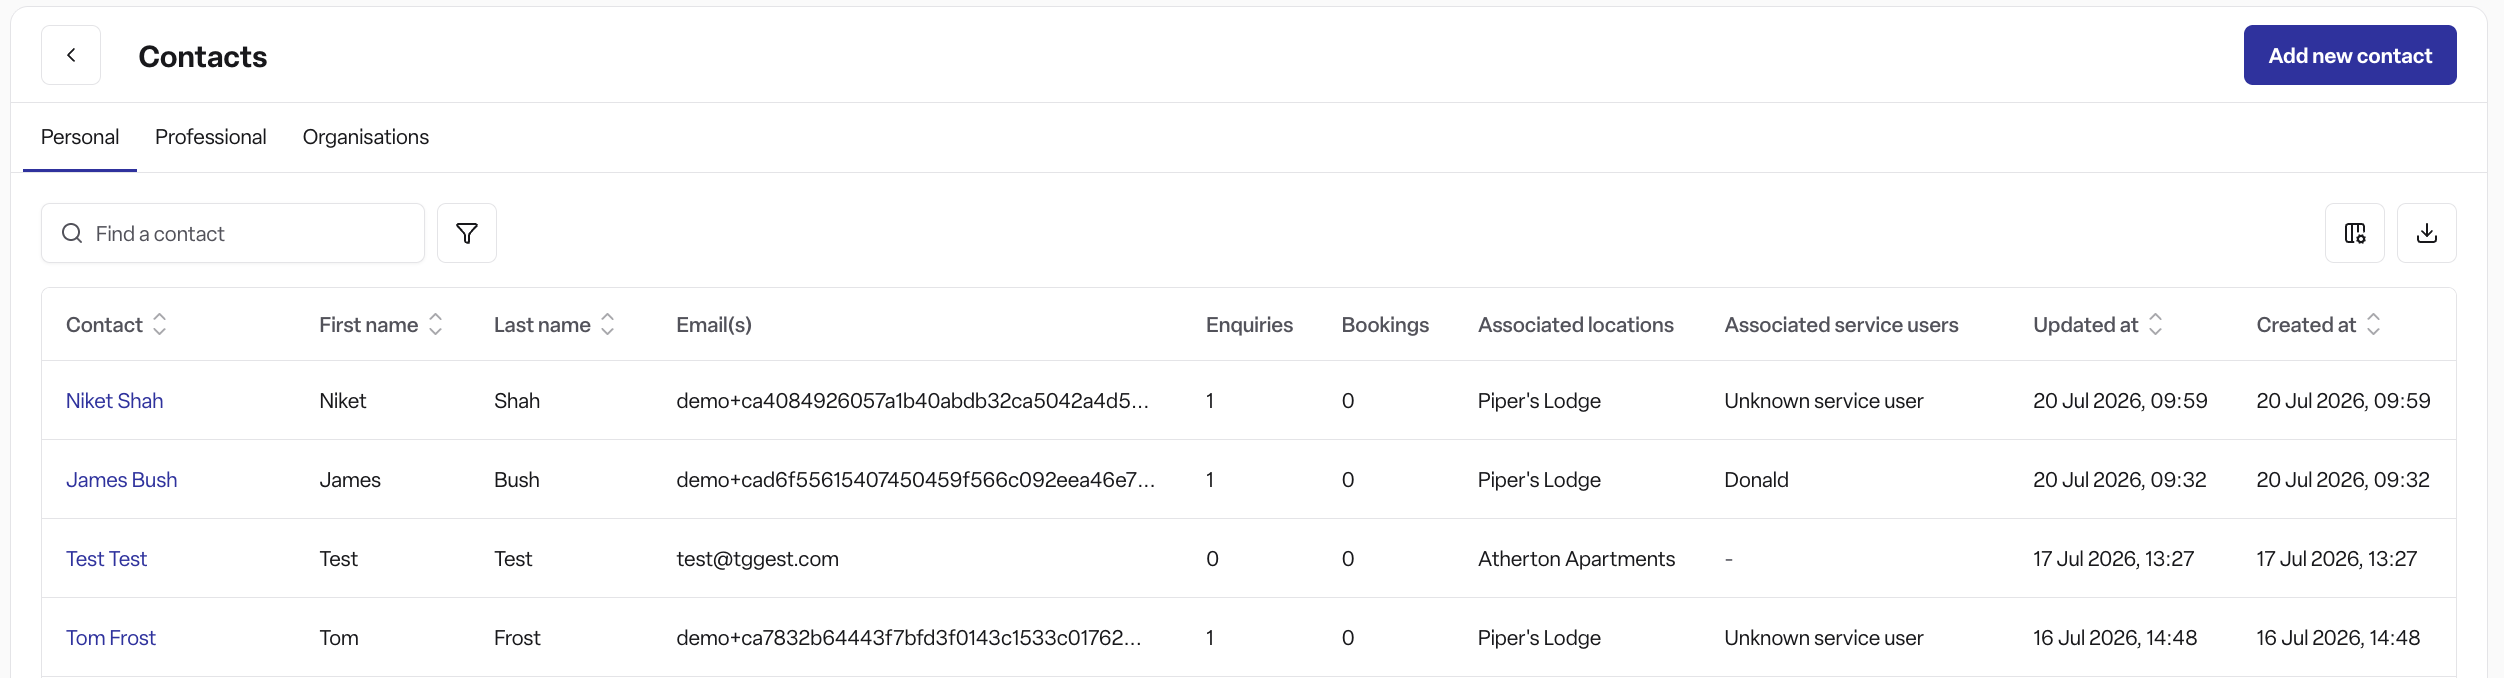
What can you do in the Contacts tab?
The Contacts tab allows you to:
Store contact details for individuals and professionals
Link contacts to service users, enquiries, and bookings
Track relationships (e.g., who is a parent, spouse, or friend)
Manage communication preferences and consent
Search and filter your contacts
Access contact history and associated activities
Understanding contact types
Found supports two types of contacts, each designed for different purposes:
1. Personal contacts
Personal contacts are the individuals in a service user's personal network. These might include:
Family members (parents, children, siblings)
Friends
Neighbours
Partners or spouses
Power of attorney holders
Next of kin
When to use: Create a personal contact whenever you need to record details for someone in a service user's personal life who is involved in their care or needs to be kept informed.
2. Professional contacts
Note: This feature is available on Pro plans only
Professional contacts are the work professionals and organisations involved in care services. These might include:
Referrers (people who refer service users to your organisation)
Social workers
GPs and healthcare professionals
Occupational therapists
Local authority representatives
Suppliers and contractors
When to use: Create a professional contact for anyone acting in a professional capacity, particularly if they have a job role or represent an organisation.
Want to learn more? For detailed information about professional contacts, including how to link them to organisations and locations, see our Professional Contacts Knowledge Base article.
How to add a new contact
Adding a new contact is straightforward. Follow these steps:
Step 1: Navigate to the Contacts tab
Click on Contacts in the main navigation menu
You'll see tabs for Personal, Professional, and Organisations — the Professional and Organisations tabs are always visible, but appear locked (with an upsell prompt) if your workspace isn't on Found Pro
Click on the appropriate tab for the type of contact you want to add
Step 2: Click the 'Add contact' button
Look for the Add contact button and click it. A form will appear.
Step 3: Select the contact type
At the top of the form, you'll see a dropdown to select the Contact type:
Choose Personal for family, friends, and personal connections
Choose Professional for work professionals and service providers
Note: If you select Professional, additional fields will appear for job role and organisation details.
Step 4: Complete the required information
Fill in the contact's details. The form is organised into clear sections:
Personal details (required)
Title: Mr, Ms, Mrs, Miss, or Other (optional)
First name: The contact's given name (required)
Last name: The contact's surname (required)
Professional details (only for professional contacts)
Job role: The contact's professional role or position (required for professional contacts)
Organisations: Link this contact to one or more organisations they work for (optional)
Contact methods (at least one required)
You must provide at least one way to reach this contact:
Email address: Add one or more email addresses
Phone number: Add one or more phone numbers
Tip: You can add multiple email addresses and phone numbers. This is useful if someone has both a work and personal number.
Address (optional)
If you want to store the contact's address:
Enter the street address (line 1 and, optionally, line 2)
Optionally add the city, county, and postcode
Note: Found only supports UK addresses — there's no country field. None of the address fields are required, even if you start filling one in.
Consents and preferences (optional)
Record the contact's preferences for:
Privacy consent: Whether they've consented to data processing
Marketing consent: Whether they've agreed to receive marketing communications
Step 5: Save the contact
Once you've completed the required fields:
Review the information for accuracy
Click the Save button
The system will create the contact and add them to your contacts list
Duplicate detection
Found automatically checks for potential duplicate contacts when you're adding a new one, matching on email address or phone number (not name). If the system finds an existing contact with the same email or phone number, it will show you the matching contact and let you either:
View the existing contact to check its details, or
Cancel and adjust the details you entered
Note: Found does not give you the option to continue creating a new contact anyway if any of their contact details match another contact — if you get this alert from the main Contacts tab, you'll need to either use a different email/phone number or use the existing contact instead. The option to directly "use" the matched existing contact in place of creating a new one is only available when you're adding a contact from within another flow, such as picking a referrer while creating an enquiry.
This helps keep your contact database clean and prevents confusion.
Working with contacts after adding them
Once you've added a contact, you can:
Link contacts to service users
A contact's relationship to a service user (parent, friend, neighbour, etc.) is set when the contact is added to an enquiry — not from the contact's own page.
From the contact's detail page, the Associated service users tab shows which service users the contact is linked to and their relationship, but this is view-only — you can't add, remove, or edit the relationship from here.
To change an existing relationship, go to the service user's own profile (its Contacts tab — typically reached via the enquiry) and use the "Edit relationship" action there.
Add contacts to enquiries
When creating or editing an enquiry, you can add existing contacts and specify their role in the enquiry process (e.g. Care seeker, Primary contact). Professional contacts can also be marked as the referrer for an enquiry.
Assign contacts to bookings
Contacts can be assigned to bookings with specific roles:
Care seeker
Primary contact
Next of kin
Power of attorney (finance)
Power of attorney (health)
View contact history
Each contact has a detail page showing:
All service users they're associated with (view-only — see note above on editing relationships)
Enquiries they're involved in
Their bookings and (where enabled) funding details
Their communication preferences and consent status
Permissions
Personal contacts – available to Admin, Manager, and Staff users by default. A workspace Admin can restrict this per role in Settings if needed.
Professional contacts & Organisations – Found Pro only. Once your workspace has this enabled, it's automatically available to all roles (Admin, Manager, Staff) — it isn't something that can be locked to specific roles.
Assigning contacts to bookings – requires the Occupancy module to be enabled for your workspace.
Funding details on a contact (funders, subscriptions, invoices) – requires Billing-related modules (Funders/Invoicing), and for funders specifically, Occupancy as well.
Adding contacts to enquiries – requires the CRM module to be enabled.
Tips for managing contacts effectively
Keep it current: Regularly update contact details when they change
Use meaningful relationships: When linking contacts to service users, select the most accurate relationship type
Record preferences: Always log communication and privacy preferences to ensure compliance
Avoid duplicates: Use the search function before adding a new contact to check if they already exist
Add context: Use all available fields to provide complete information—it helps your team communicate effectively
Searching and filtering contacts
The Contacts tab includes search and filtering tools to help you find contacts by name, email, phone number, organisation, location, or contact type.
Frequently asked questions
Q: Can I delete a contact? A: No — Found doesn't currently support deleting a contact. Once created, a contact record stays in your contacts list permanently (there's no delete or archive option, unlike organisations which can be archived).
Q: What's the difference between a personal contact and a professional contact? A: Personal contacts are individuals in a service user's personal life (family, friends), while professional contacts are people acting in a professional capacity (social workers, GPs). Professional contacts require a job role and can be linked to organisations.
Q: Can one person be both a personal and professional contact? A: In Found, each contact record is either personal or professional. If someone acts in both capacities (e.g., a family member who is also a healthcare professional), you would typically create them as a personal contact if their primary relationship is personal.
Q: Do I need permission to add professional contacts? A: Professional contacts and Organisations require your workspace to be on a Found Pro plan. If your workspace has this enabled, the Professional and Organisations tabs will be visible to you (not hidden) — if they appear locked, contact your system administrator about upgrading your plan rather than requesting a permission change.
Q: What happens if I try to add a contact that already exists? A: Found will detect a potential duplicate by matching email or phone number and show you the existing contact so you can view it instead of creating a new one — it won't let you create a new contact anyway if the details match. If you're adding the contact as part of another flow (like assigning a referrer to an enquiry), you can also choose to use the existing contact directly.
Q: Can I edit a contact's relationship to a service user from the contact's page? A: No. The contact's page only shows the relationship (read-only). To change it, go to the service user's own profile and use the "Edit relationship" action there.