Embeddable enquiry forms for your website
Last updated: July 27, 2026
Pro feature: This feature is available on Pro plans only. If you’d like to upgrade your plan, please contact our support team.
Overview
Embeddable forms let you add a Found enquiry form directly to your care home or home care website. When a prospective resident, family member, or client fills in the form, a new enquiry is automatically created in Found - no manual data entry required.
Forms are fully customisable: you choose which fields to show, set your own labels, decide which are required, and configure what happens after submission (a thank you message or a redirect to another page on your site).
This feature is available on the Found Pro CRM plan.
How it works
Create a form in Found under Settings > Workspace > Forms. You can start from a preset (Contact us, Enquiry, or Book a visit) or build one from scratch.
Copy the embed code generated by Found and paste it into your website's HTML where you want the form to appear.
Enquiries flow in automatically. Every submission creates an enquiry in Found with the contact's details, care preferences, and any other information captured by the form.
The embed code looks like this:
<div data-found-form="your-form-id"></div><script src="https://forms.lottie.org/embed.js"></script>You can place this snippet on any page of your website. No coding knowledge is required beyond basic HTML editing.
Setting up a form
Creating a form
Go to Settings > Workspace > Forms.
Click New form or select one of the preset templates.
Choose whether the form is for a care home or home care location.
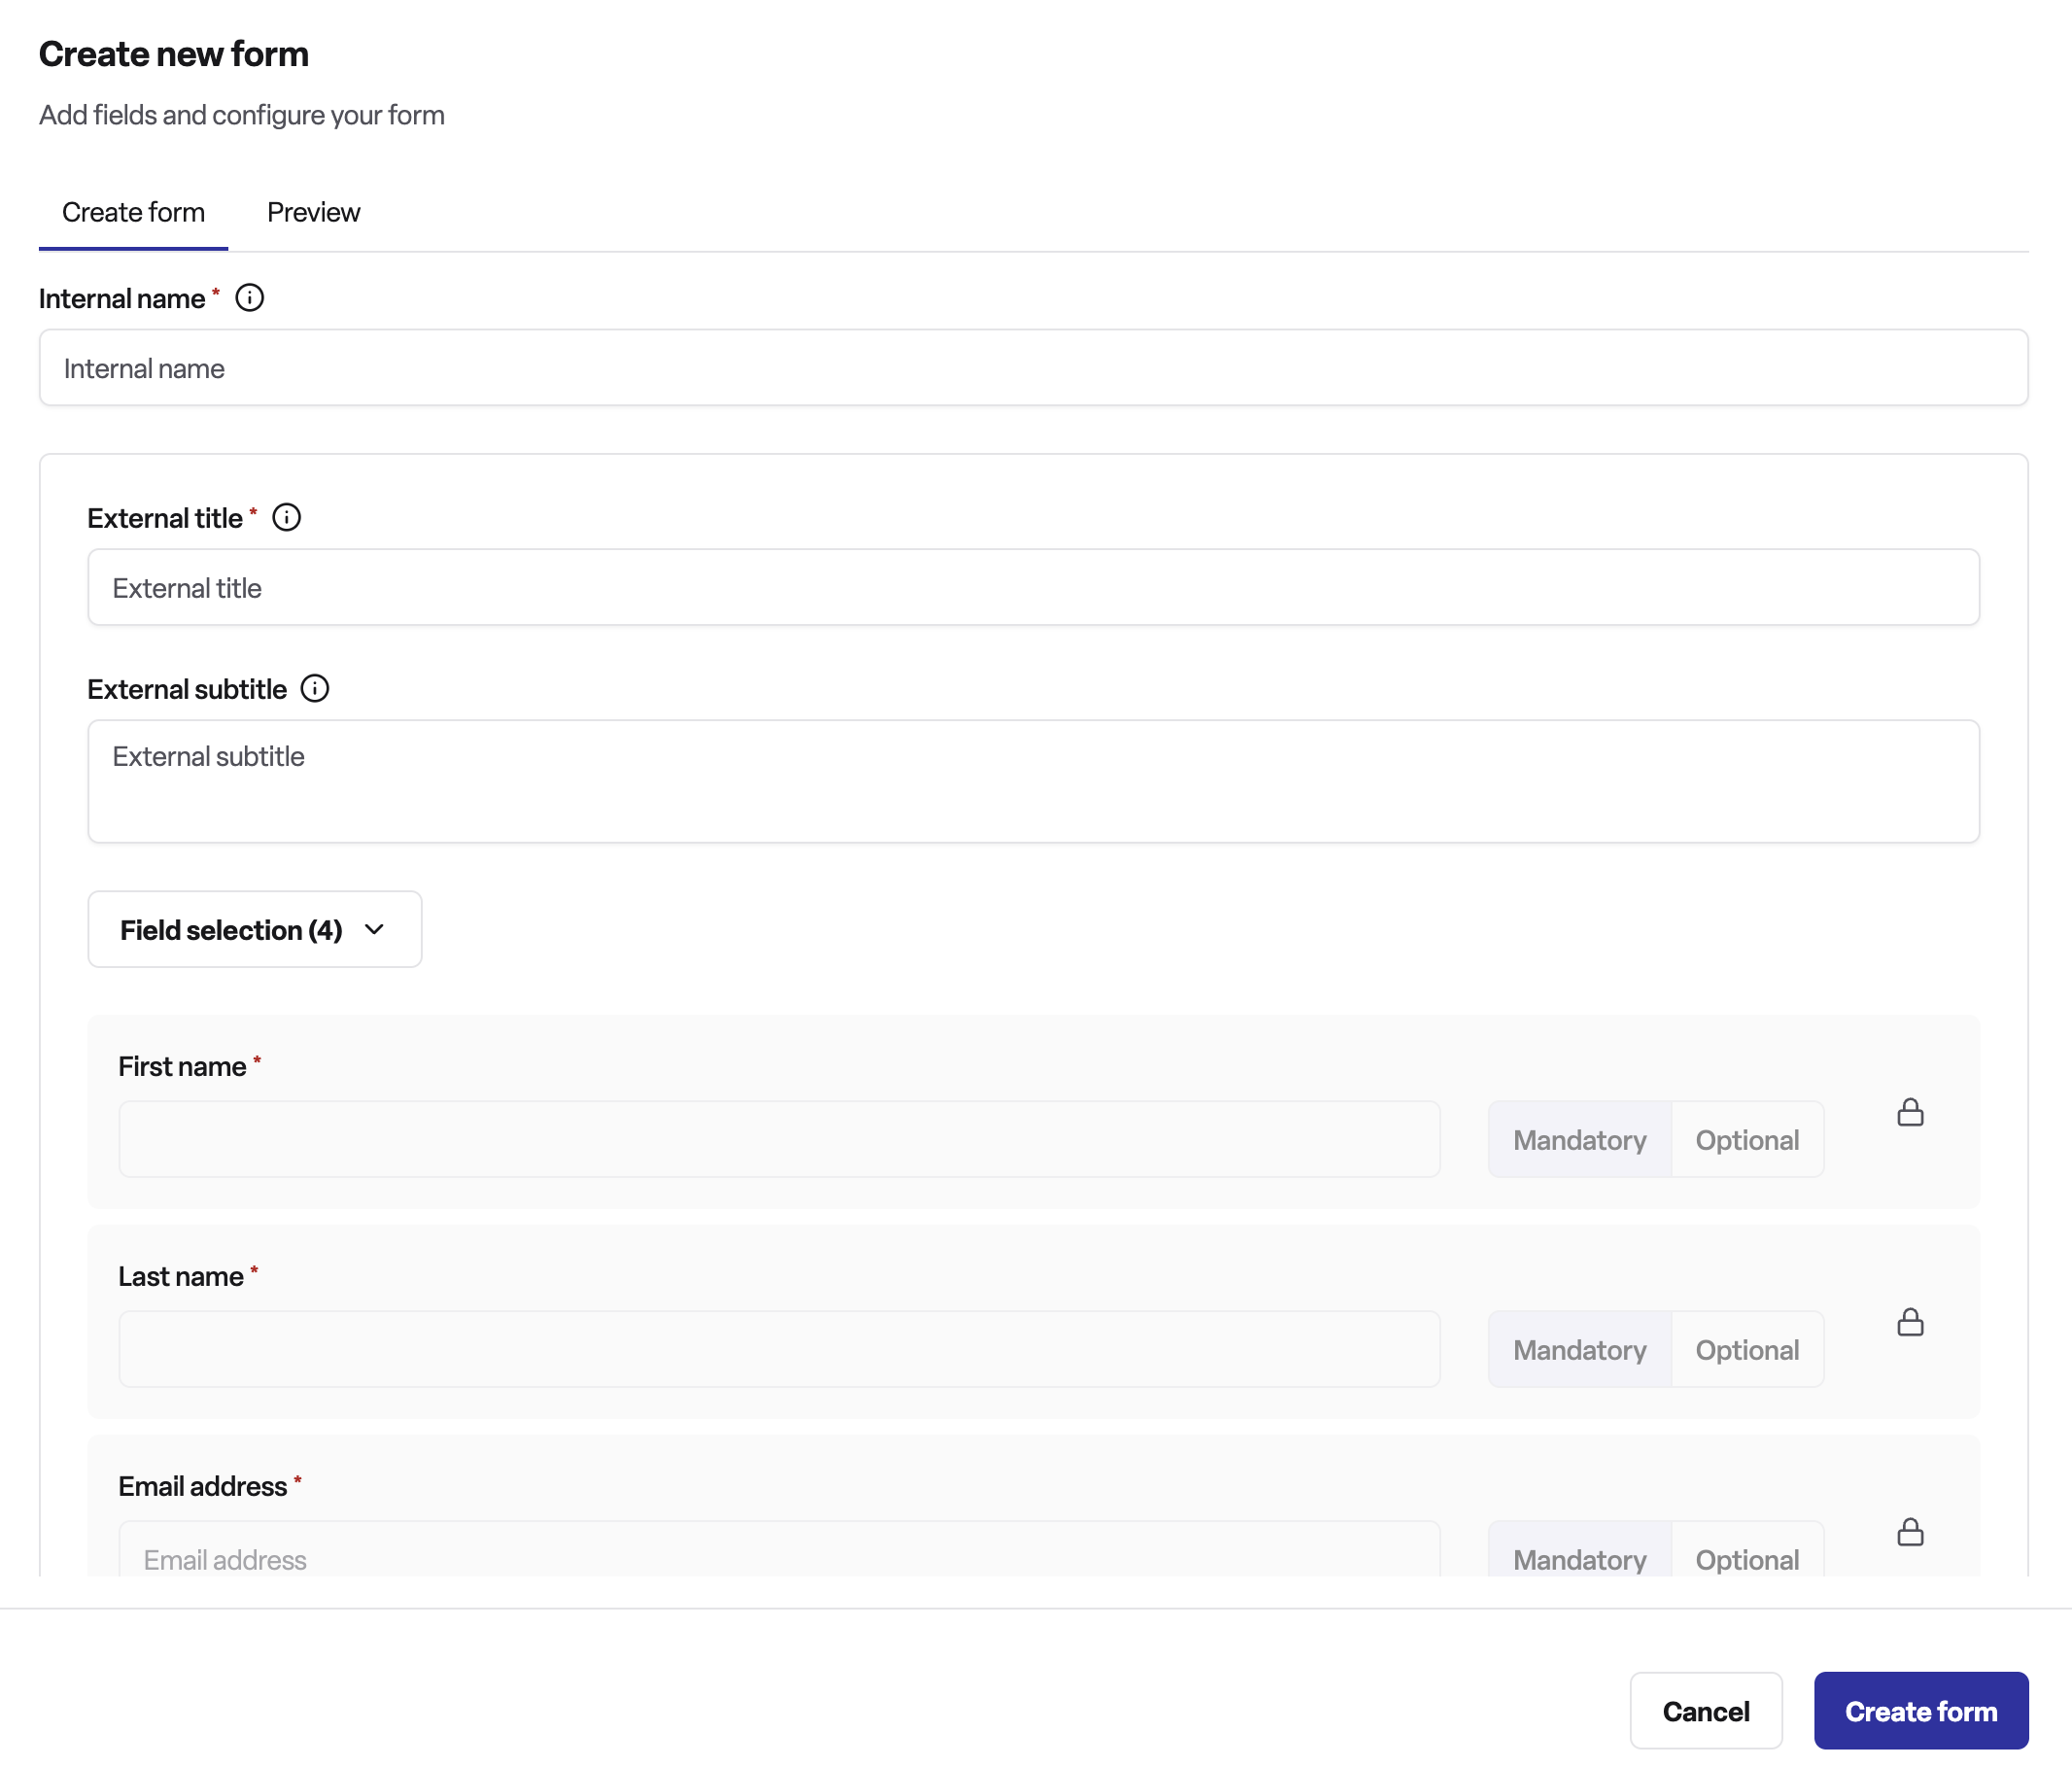
Give your form a name (internal reference) and a title (shown to visitors).
Add an optional description beneath the title.
Select and arrange the fields you want to include.
For each field, you can customise the label, mark it as required or optional, and (for dropdowns) choose which options to show.
Configure the confirmation: either a thank-you message (with a title and optional body text) or a redirect to a URL on your website.
Click Create form to save.
Embedding the form on your website
Open the form in Found and click Get embed code.
Copy the HTML snippet.
Paste it into the HTML of the page where you want the form to appear.
The form will load automatically when a visitor lands on that page.
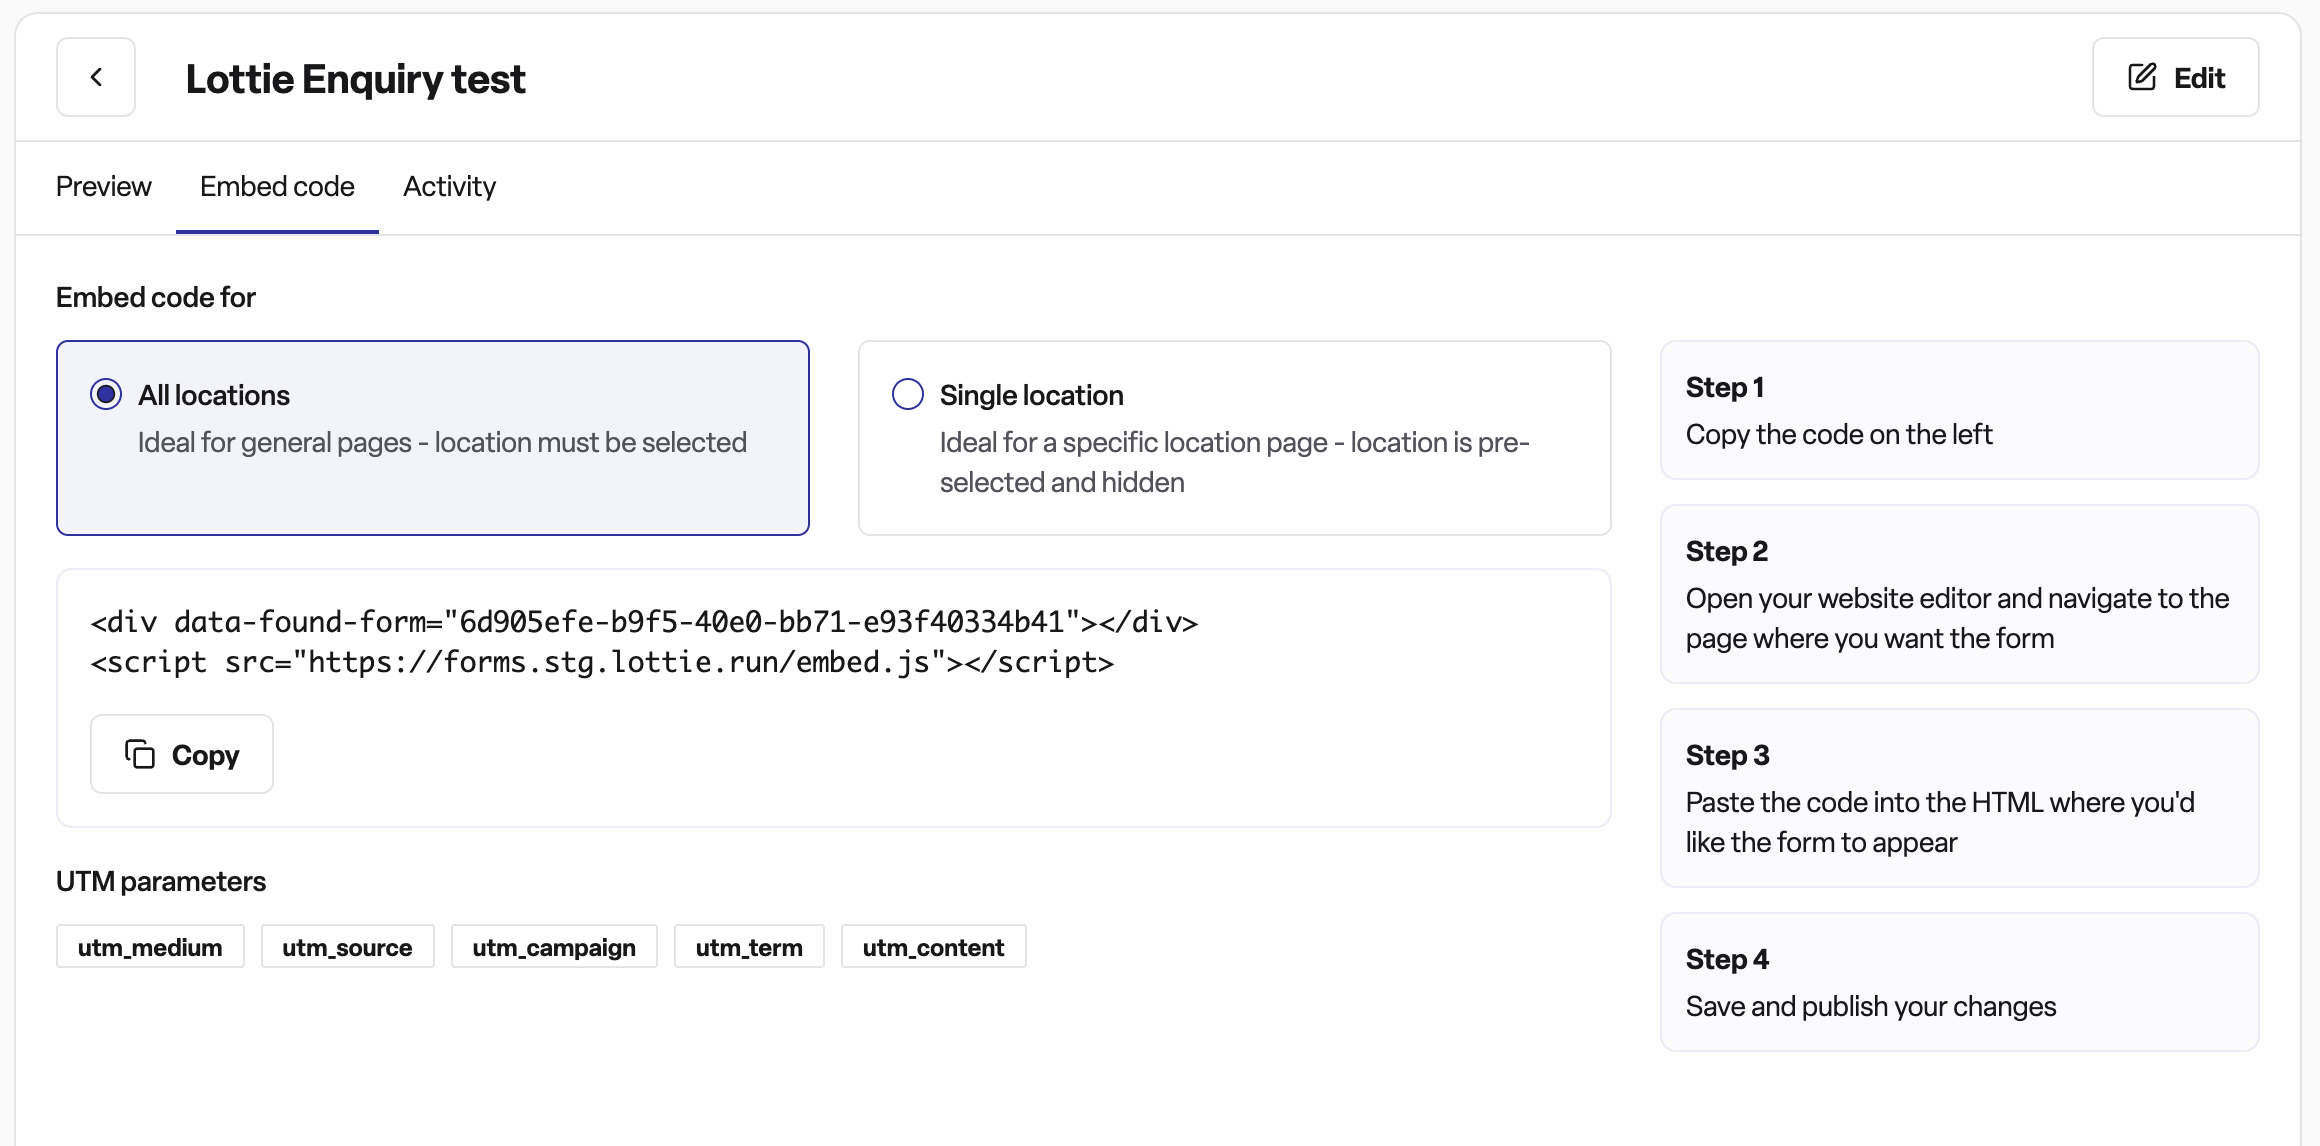
If you have multiple locations, you can optionally specify a data-location-id attribute in the embed code to pre-select a specific location.
Care homes vs home care
Found supports two form types - one for care homes and one for home care. When you create a form, you select which type it is. This controls:
Which fields are available — home care forms include fields specific to home care services, such as preferred visit days, visit duration, and preferred carer gender or language. These fields are not available on care home forms.
Which care duration options appear — care home forms include Day, Respite, Permanent, and Ongoing. Home care forms show Respite and Ongoing only.
Which care type options appear — care home forms include Residential, Residential dementia, Nursing, and Nursing dementia (plus Hourly care, Live-in care, and Overnight options). Home care forms show only the home-based care types.
Which of your locations are listed — if your form includes a location selector, only locations matching the form type are shown. A care home form will never list home care locations, and vice versa.
Where the enquiry data goes in Found — submissions are automatically stored against the correct care type in the enquiry record.
Fields available on home care forms only
Field | Description |
Indicative start date | When care is expected to begin (e.g. ASAP, 1–2 weeks, 1–3 months) |
Days of the week | Which days of the week care is needed (multi-select) |
Minutes per visit | How long each visit should be (e.g. up to 30 minutes, 1 hour, 2 hours) |
Carer language preference | Free-text field for language requirements |
Carer gender preference | Male, Female, or No preference |
Prerequisites
Before you can create and use an embeddable form, make sure the following are in place.
1. Found Pro CRM plan
Embeddable forms are a Pro CRM feature. If you cannot see Settings > Workspace > Forms, your workspace does not have this feature enabled. Contact your account manager to check your plan.
2. Admin role
Only workspace admins can create, edit, and manage forms. If you are logged in as a Manager or Staff member, you will not have access to this area. Ask your workspace admin to set up the form, or ask them to update your role.
3. At least one location configured
Your workspace must have at least one location set up that matches the form type you want to create. For example, if you are creating a care home form, you need at least one care home location in your workspace. Without a matching location, form submissions cannot be processed.
To check your locations, go to Settings > Locations. If no locations are listed, add one before creating a form.
4. Location type matches your form type
Each location in Found is set to a type (care home or home care). When a visitor submits a form, Found matches the submission to a location of the same type. If you create a care home form but have only home care locations configured, submissions will fail.
Make sure the location types in your workspace align with the form type you intend to create.
5. Marketing source options (if using the marketing source field)
If you want to include a marketing source field on your form (so visitors can tell you how they heard about you), your workspace must have UTM source categories configured. These are typically set up as part of your initial Found onboarding. If the marketing source field appears greyed out in the form builder, contact your account manager.
Why use embeddable forms?
No duplicate data entry. Enquiries from your website arrive directly in Found with all the details already filled in.
Faster response times. Your team sees new enquiries in real time and can follow up immediately.
Consistent data capture. Every web enquiry follows the same structure, making reporting and filtering more reliable.
UTM attribution. Found automatically captures UTM parameters from the page URL, so you can see which campaigns are driving enquiries.
GDPR-ready. GDPR consent is a required field on every form. Marketing consent is always optional, matching best practice.
Form submission history. You can view all submissions for each form, including the data submitted, directly in Found.
Frequently asked questions
Q: How many forms can I create?
A: There is no set limit. You can create as many forms as you need — for example, one per location, one per service type, or separate forms for different pages on your website.
Q: Can I use the same form on multiple pages?
A: Yes. You can paste the same embed code onto as many pages as you like.
Q: Can a care home workspace use a home care form, or vice versa?
A: No. Each form is set to either care home or home care when it is created. This cannot be changed after the form is saved. If you need a form for a different care type, create a new one.
Q: What happens to the enquiry if a visitor doesn't fill in every field?
A: Only required fields block submission. Optional fields can be left blank, and the enquiry will still be created in Found with whatever data was provided.
Q: Which fields are always required and cannot be removed?
A: First name, last name, email address, and (if included) location are locked as required fields. GDPR consent is also always required. These cannot be made optional or removed from the form.
Q: Can I customise the thank-you message after submission?
A: Yes. You can set a custom title and optional body text, or redirect the visitor to a specific URL on your website (for example, a dedicated thank-you page).
Q: Does the form work with Google Tag Manager?
A: Yes. If you (or your web team) add your Google Tag Manager ID in the form settings, Found will automatically send events when the form loads and when it's submitted, so it can be tracked alongside the rest of your website analytics.
Q: Where do I see the enquiries that come through a form?
A: They appear in the main Enquiries list in Found, just like any other enquiry. They are tagged with the contact method "Contact form" so you can filter by source. You can also view all submissions for a specific form under Settings > Workspace > Forms > [form name].
Q: What if I want different forms for different locations? A: You have two options. You can create a separate form for each location, each with its own embed code — the simplest approach if you only have a few. Or, if you'd rather use one form across your whole site, ask your web developer to add one small addition to the embed code (the data-location-id attribute) that tells the form which location to pre-select on each page.
Q: Do I need to know how to code to add a form to my website?
A: No. Found generates a ready-made snippet for you — you just copy it and paste it into your website where you want the form to appear. If you use a website builder (like WordPress or Squarespace), your usual "add HTML" or "embed code" block will work. If you're not comfortable editing your website's HTML yourself, send the snippet to whoever manages your site and ask them to add it.
Q: I can't see Settings → Workspace → Forms — why not?
A: This is usually one of two things. Embeddable forms are a Found Pro feature, so if your workspace is on a different plan, this area won't appear — contact your account manager to check. If you're on the Pro plan but logged in as a Manager or Staff member, you won't have access either, since only workspace admins can create and manage forms — ask your admin to set the form up, or to update your role.
Q: My marketing source field is greyed out in the form builder — what does that mean?
A: This field needs UTM source categories to be set up for your workspace first, which is normally done during onboarding. If you'd like to add this field, contact your account manager and they'll get it configured.